Showing posts with label Work in Progress. Show all posts

10.02.2009

Hirts Arts Moulds and Mordheim Buildings part 1

It's been a month vacation that caused nothing much for me to have produced in the modelling/gaming part and therefore no need for blog posts :) But I have ordered three moulds at Hirst Arts. I ordered the following ones:
#51 Dragon's Inn Mold
#201 Floor Tiles Various Sizes
#40 Basic Block Mold

My idea was to have enough bricks for builidings as well as arches for windows and doors. Floor tiles for flooring of course but also for building streets.

I started casting the moulds with modeling plaster. I found 2 brands: Knauf and Krone.

Knauf is found at the DIY store and Krone I found in a local arts and crafts shop. The Krone is almost half as cheap but they both are not that expensive: Knauf sells at EURO 6,00 per 2,5 kilo and the Krone at EURO 2,00 per 1 kilo or EURO 6,00 per 5 kilo.
I already casted the moulds about 8 times and it seems that is enough for making a tavern or something. Now some lasts casts are done, so I have enough stock to start building.
Of course the buildings will consist of more than plaster blocks alone. I went to the DIY store and got some lengths of 10x10 mm square and 5x20 mm flat pieces of wood. Almost 3 meters in length this should give enough beams and planks for roofs and doors and floors.
Also I got a piece of 4mm MDF that should act as a base for the building. Everything should be modular so I'm going to design 2 or 3 sizes of bases. These can have either a building or a piece of street, square or other scenery for the city of Mordheim that can be built with it. The first building will be the dragons Inn tavern from the Hirst Arts website. I'm going to alter it a bit so it's open to one side and it can be used in Mordheim for fighting in and around. SInce Mordheim is a thrashed and worn down city the buildings should resemble this. The roof will be crashed in, that kind of stuff.
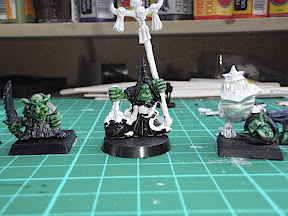
When going out for buying the raw materials I also came acros my local games workshop store. It had a nice boxed set of trees.

I was looking for something like that, because the Mordheim buildings should have some grown over moss, plants and trees in them as well. This box with three large gnarly trees will be just right for the purpose. Also some chains, skulls and signs are in the kit that will fit perfactly in the Mordheim scenery I'm making.

For now some more casting and the building will start! Time for me to take out the saw and cut me some beams and create the MDF base plates.

More will follow in next posts, so keep reading!

8.03.2009

Paint Session Goblins (3)

It has been a while since the first stage of gobbo painting (Night gobbo painting that is). Of course I have been doing some painting in the mean time (I'm not that slow) but not always them gobbo's. The dwarf treasure hunter Morheim gang is taking shape and I found some gnoblar trappers that will do nice as cool base-additions to the existing gobbo's. Bases are still a poblem for me. I can't get the hang of finding a good theme and stick with it for the entire gang.

Anyway how are the gobbo's doing I posted earlier? My way of painting consists of doing one color at the time and if possible working it out entirely. Starting with the large surfices I work m way to the details. The large surfaces are also ideal for highlighting easy and these are the first things I did. With these night gobbo's I started with the green skin of the gobbo's and finishing it with severel highlights.
Next stage are the black clothing the night gobbo's hae. I reworked all black surfaces in a clean way. That means that I paint all items black with clean lines bordering other (future) color areas. In this way I don't have to keep reworking parts because other areas are "tainted" with the wrong color. I like clean lines here where possible. So black areas were done and I highlighted them towards a light bleue. First stage is a heavy regal blue highlight to give the night goblins the look of wearing midnight blue robes. Because wear and tear they are highlighted towards light blue and even light grey is used here.

Next up are the silver areas I started with boltgun metal painting the iron/silver parts. The iron parts will be worked upon with a black ink probably, leaving it a dark metally surface (like the pot of the night goblin shaman). The silver parts ( I like my night goblins to have lots of silvery jewelry) will be highlighted with chainmail metal (earrings, bracelets, etc.).
After this it is basically time for detailing the gobbo's This means picking out the bad moon symbols, mushrooms they are carrying, weapons, etc. I use bright colors for small items so they stand out. Also some skulls have to be done and they will be "bony" in look and feel. Starting with black dark browns, I then usually highlight them to bleached bone (in rare occasions even a final white highlight).

7.08.2009

Paint Session Goblins (2)

A new paint session for the gobbo's just finished. In the previous post you could see the first stage of getting the green color on the skin of the gobbo's. Now the goblins get their layers of highlights after the goblin green and green ink. A new highlight of goblin green is applied after which a transition to rotting flesh green is applied. It is finished off with a some layers towards bleached bone. This is the status right now.

6.30.2009

Paint Session Goblins(1)

Recently I decided that tuesday night will be a regular painting slot. Our gamers are invited to stop by for some painting, modeling or just having some coffee and a chat about new warbands, upcoming games and whatnot. I've just finished my first tuesday evening painting and of course want to share with you the results.
For long I paint model by model. Sometimes I have severel projects going on but basically it's painting one model at a time. Now I wanted some extra models for the Wee Free Men warband, to easily switch when weapons change or extra warband members have to be hired. I also got a new (real!) night goblin shaman model from Hans that needs to be painted. Therefore with all these new models to paint, I decided to paint them together. Same stages for every model at the same time. Consistency of shading, color, highlights, inks etc. are now guaranteed basically, so actually it's quite a pre. Not too much at the same time but around 5 models will do for now. See how this will work out.
Current stage for all models is that they have a base coat of goblin green where needed (face, arms and legs) and a black layer on all things clothes related. Some parts where dark shading is needed I also aplied a bit of chaos black. For all Goblin Green parts I inked the creases with dark green ink. Now they can dry and the next time I'll (highlight) a new layer of Goblin Green to have nice tight dark green edges and deeper areas. After that I'll highlight the green parts up until almost white edges.
What are the results for today then! Okay, here they come.

First up these 3 guys, they are from left to right: a snotling modelled to hold a big mushroom (only black undercoated for now), A night goblin holding a spear and another night goblin holding a spear (also modelled an arrow through its hat!)

In the centre of this picture you'll see a night goblin champion. I removed the shield holder on its left hand and remodelled the hand again.

How cool is this project! It's of course a squig standing on half a goblin. Modelled the squig so its leg could actually stand on the head of the gobbo. The gobbo is half dismemberred and notice the foot standing beside the model. That will eventually stick out from between the teeth of this squig. How vicious and evil can a squig look eh!

This is the night goblin shaman I was talking about. First stage of painting obviously. He will probably get a couldron with some purple or bright green broth in it.

This is obviously a work in progress in a further stage that I wanted to showcase. This is my new Night Goblin Big Boss mounted on the giant squig. It is quit far finished already, but I am having trouble with the base. The idea is a spear in the ground and a giant musroom, but what to with the rest of the vast base..... Probably keep it "clean" with some grass or sand..... still thinking about this one.

6.07.2009

Wee Free Men, meet: Gasher

The Wee Free Men have their set of squigs that wreak havoc in enemy lines. They are controled by some of the night goblins if they can focus. This is one of 5 and is called Gasher! A realy nasty squig that loves to bounce into battle.

Sometimes the squigs run out of control and start nibling on the warband members. To represent this I started to convert a squig to eat one of the night goblins. A leg has to be added sticking out of his mound, but I think it is a good start. Of course this blog is to show further stages in the conversion and paint process so keep checking to see progress.